A Modern Day Recreation Of
The Original Eddie kite
Based on the Eddy Kite Patent No. 646, 375
issued on March 27, 1900.
By Dennis Ische
Introduction
Back in the mid to late 1800's there was a quest for scientific information about our earth. Obtaining it from anywhere above the surface meant either using hot air balloons or kites. Airplanes were on the horizon but hadn't been made to fly then. This is where William Eddy, a newspaper man, dove in and made history.
He saw what was happening in the scientific community and what had to be done and set about doing it! This is where the kite bearing his name come to be.
Now over a hundred years later I took what he discovered and brought it up to date. Materials have come a long way from spruce and cotton sail material. Now Epoxy and carbon tubes and ripstop nylon ate the norm. The following is how I created a modern version of a classic kite.
Materials
Depending on the size of your Eddy the materials will vary. Here are the basic list of parts you will need.
- carbon or fiber glass tubes
- plastic or aluminum Tee at the cross points.
- 4- arrow nocks to fit the tubes
- 4- Aluminum rings
- short length of heavy flying line
- 4 oz. dacron reinforcing
- solid core dacron or a low stretch line for the perimeter lines, bridle and bow line.
- 3/4 oz. ripstop nylon for the sail or other lightweight material. eg. tyvek
The Plans
Eddy had patented his invention in the year 1900. It is that patent that I used for the basis of my modern version. This is the frame, perimeter lines and sail plan for a modern Eddy.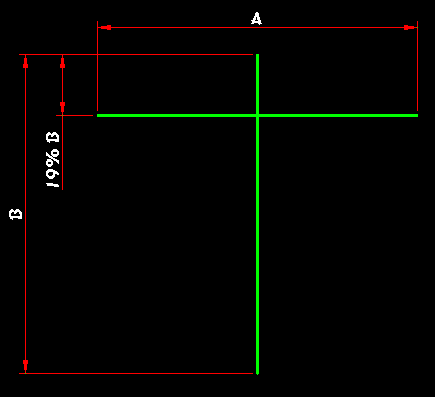
Frame Plan
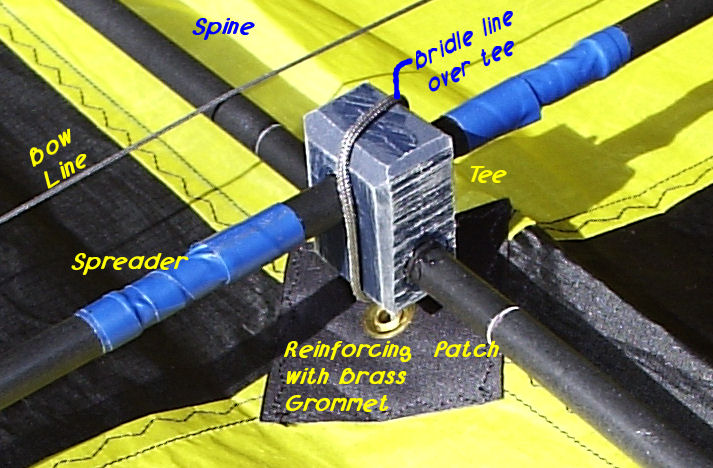
A plastic or aluminum Tee is used at the frame crossing point. This tee is similar to ones used on sport kites. The spine is on the sail side while the spreader is above. This allows for a "keel" effect along the spine by the sail. I also make the spine and spreader stop at the tee so they don't shift up or down or left or right. The holes in the tee are big enough to allow an interior connector or ferrule to pass through while the spar stops against the tee.
Perimeter Line Plan
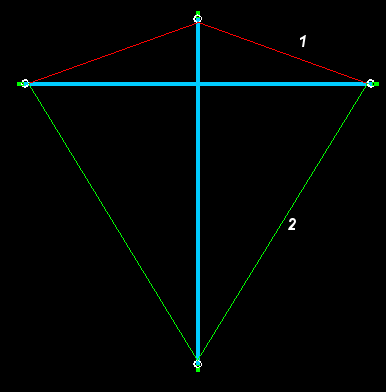
A good construction trick. In order to thread the perimeter line through the edge seam pockets... I made the line for the top part (red "1") that went from wingtip to nose to wingtip as one line. A loop was put into each end of the line for larksheading to wingtip rings. I could then thread the ends from the nose to the wingtip and also larkshead it to the nose ring and center it by holding the two loops for the wingtips even and larksheading the ring at the center. A great way to balance the kite side to side. Worked like a charm. Of course the same for the bottom line. (green "2")
One last thing on the perimeter lines... I make the top (red) line a bit tighter than the bottom (green) line. This makes the wingtips sweep forward just a bit so when the bow line is tight the line crosses the spine about an inch above the Tee. This is also from the patent description.
Sail Plan
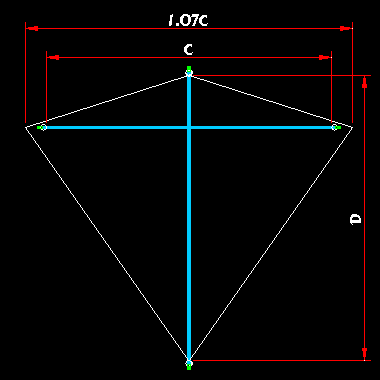
The finished size of the sail can only be determined after the frame and perimeter lines are complete. The height is equal to dimension "D". This is the distance between the points where the perimeter lines are attached to the rings. the finished width is 7% more than dimension "C". This will allow for the "loose fit" that Eddy himself describes in his patent.
Either a seam allowance big enough to allow the perimeter strings to pass through or a leading edge material can be applied along the leading and trailing edges. I have used both successfully. I always add 4 oz. dacron reinforcing at the wingtips and nose and tail to take the rubbing of the perimeter lines on the sail.
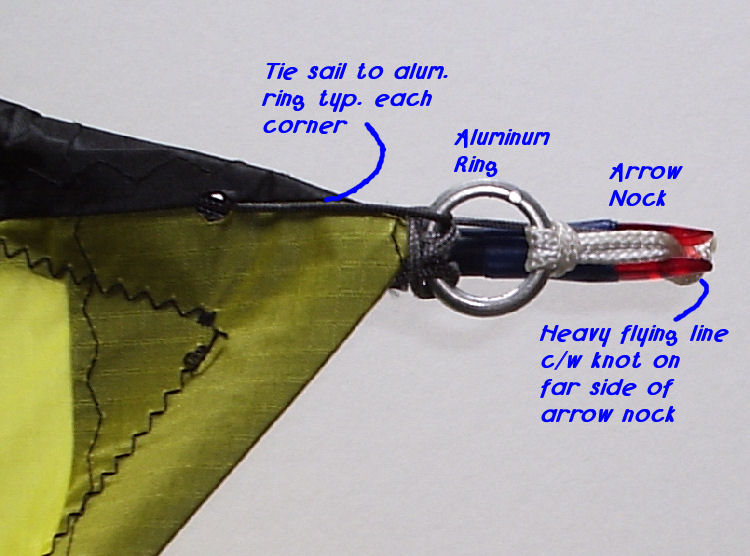
One last note on the sail. I tied the nose/tail/wingtips to the aluminum rings to keep them in place. The tail especially will "ride up" the perimeter lines as they move inwards. A hole or two melted through the reinforcing and a line passed through and tied through the ring does the trick.
Construction Notes:
There were a few things along the way that made building these kites easier. I always put a piece of dacron reinforcing at the cross point on the sail and a brass grommet at the same point to allow the front bridle point to be tied to the Tee.
Speaking of the bridle... the front point is at the Tee or cross points of the spine and spreader. The rear point is at the tail arrow nock. I usually larkshead the bridle to the arrow nock/frame. Then pass the heavy line of the aluminum ring through the bridle loop and over the arrow nock. The bridle point stays "put" that way. The length of the bridle is one of constant debate. Taking the initiative, I did my own thing. I took notes from my fighter kites and when the bridle is pulled tight it is approx 1 to 2 inches in from the wingtip. That way it won't get caught up over the wingtip in flight. Man that can ruin your day. I larkshead another aluminum ring with a tow loop on the bridle to allow for easy adjustment. Works great. You will find the typical tow point is just ahead of the leading edge when the bridle is pulled tight and laid down on the sail.
The bow lines are made from the same line as the bridle/perimeter lines. I make a loop in one end and hook it to a wingtip nock. Then run back around the other wingtip nock and then a slip knot is tied that allows for the bow adjustment. (see below). Saves buying more material and works very well.
I made 5 different sizes of Eddy Kites to date and below is a table of size and frame material I used for each. This is just a guideline and you can play with different materials for the frames. Keep the experiment alive!! ;)
spar Chart
Size |
Spine |
Spreader |
| 4 Foot | C30 fg* | C30 fg |
| 5 Foot | K75 fg | C30 fg |
| 6 Foot | K75 fg | C30 fg |
| 7 foot | FL414 fg | FL414 fg |
| 9 Foot | FL505 fg | FL505 fg |
| *fg = Fiber glass Tube |
Conclusion
Well that should get you one cool modern Eddy Kite in the air. When flying your new kite you can adjust the tow point till the kite is pretty much "glued" in the sky. If it has a tendency to tilt over you have the tow point too far back towards the tail... move it up in small steps. If your kite dances around you probably have the tow point too far forward. Move it back. The larger kites really pull hard so be sure to use appropriate flying line. In strong wind I use 500 lb. braided dacron on the 9 footer. Just to give you an idea.Enjoy yourself.... Fly safely... know that you are flying a "Classic" design that you can be assured nobody else is!
If you have any questions please don't hesitate to ask.
Dennis Ische
aka "the mad scientist"
This site has been modified on March 18th, 2021
|